Showing posts with label Asian. Show all posts
Images

Sweet Soy Sauce Herbal Chicken


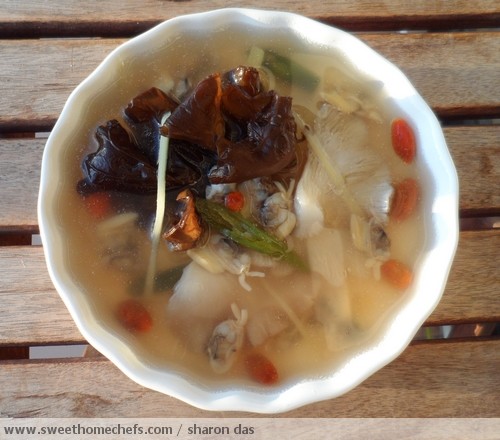
Sweet Soy Sauce Herbal Chicken with Red Dates, Yu Zhu and Wolfberries

Just something I cooked the other day because I was itching to get away from my regular soy sauce chicken recipe, which typically involves only dousing light and dark soy sauce together for taste. It's my lazy-day favourite.

In this recipe though, several natural sweetish ingredients were included to enhance the flavour, like red dates, Yu Zhu (Solomon’s Seal Rhizome - Learn more about Yu Zhu here. ) and carrots. In short, I've complicated the recipe a little for something richer.

The end result is a yummy sweet-salty herbal chicken dish that compliments plain brown rice or yam rice.

This is the recipe. I hope you enjoy this as much as I did!

Ingredients:
- 5 pcs chicken drumstick
- 1 clove garlic (chopped)
- ½ medium carrot (julienne)
- ½ small cabbage - just a handful (sliced)
- 1 tsp dried wolfberries (rinse and soak in water for 10 minutes)
- 6 slices of dried Yu Zhu (rinse and soak until tender, preferably overnight)
- 2 medium dried red dates (rinse and soak in water for 30 minutes, make a small cut before cooking)
- 1½ tbsp light sweet soy sauce
- 1½ tbsp oyster sauce
- 1 tsp corn flour to thicken (diluted in a bit of water)
- Pinch of salt and pepper
- 1 tsp cooking oil
- 2-3 cups water
- Spring onions (chopped) for garnishing

How-to:
1) Heat cooking pan with oil. Add garlic and fry until lightly browned.

2) Add chicken and carrots. While stirring, season with soy sauce and oyster sauce.

3) Add water, followed by red dates, cabbage and solomon's seal. Stir well and simmer until the chicken is cooked and slightly tender (about 45 minutes). Add more water if it gets too dry.

4) Taste and season with a pinch of salt (if necessary) and pepper. Stir the wolfberries in at the last five minutes of cooking.

5) Switch the fire off, add the corn flour while it's still hot and stir well. Serve garnished with spring onions.

Yummy Herbal Chicken


Serve garnished with spring onions!

Images

Old Cucumber and Salted Kohlrabi Chicken Soup


Old Cucumber and Salted Kohlrabi Chicken Soup
 
It was in our Facebook group that I'd first heard of salted kohlrabi. Kohlrabi - what was it...german turnip, cultivar of cabbage ..according to Wikipedia.

Salted Kohlrabi

I've so far only included it in soups but I'm guessing it'll go great in braised dishes as well. 

It wasn't easy trying to find this ingredient. Partly because I had no idea how it would be packaged for the supermarket. I took some time reading the labels for each salted vegetable I picked up and it would have been easier to spot had it not all been compressed in little clear plastic packets. But joy, I found it!

AndDdDDdddd.. so was born this easy soup recipe.

Ingredients:

- 2 pcs whole chicken leg
- ½ medium old cucumber (remove seeds and slice)
- 1 medium red onion (quartered)
- 1 slice salted kohlrabi (rinsed and sliced into smaller pieces)
- 4 pcs dried black fungus (medium variety, soaked for 30 minutes, remove hard parts, slice into smaller pieces  if you wish)
- 1 medium carrot (cubed)
- 1- 1.5L water
- Salt and pepper to taste
- 1 stalk spring onion (chopped, for garnishing)


The ingredients

How-to:
1) Lay all the ingredients in the pot. Pour water in.
2) Boil until chicken is tender. (One hour on medium heat did it for me.)
3) At the last stage of cooking, taste and season with salt (if necessary) and pepper. Cook for awhile longer.
4) Serve garnished with spring onions.


Slow boil

Tadaaa! Tender chicken with salted kohlrabi and old cucumber

Soup of the day..slurp!


Images

Sweet Leaf and Sweet Potatoes in Coconut Soup

Sweet Leaf and Sweet Potatoes in Coconut Soup

I try to include greens on the menu daily. It's a habit that has been passed down from generations.

Gone are days when mom had to force us to "eat our vegetables!". I used to have a hard time swallowing it. More than once, I pretended to pile a hollow mountain of greens on my plate, fluffing it up to give the illusion that I was that obedient girl who had taken her share...more than.

Today, I chomp greens down wholeheartedly! I've often wondered why the experience was nightmarish before. Has this something to do with old age? Was it a case of 'mind over matter' or have I just lost my fussy side? Maybe.

I love Sweet Leaf (Sayur Manis) , a vegetable that isn't always available in the supermarket I regularly shop at. So, I get very excited when I do see it and I don't hesitate grabbing a bunch home.

Sweet Leaf

I made a coconut soup dish with the sweet leaf I purchased. Locals know this as "Masak Lemak"  style. Literally translated as "cooking fat" : Usually taken to mean that this dish will have a coconut milk based soup. It is usually eaten with rice.

But I was in the mood for something without rice, something soupy. So was born this lite version - less coconut milk in my recipe but just as yummy and delightful.

IF I'm having it with rice however, I would add in more coconut milk and make the gravy thicker. It gives the dish a richer taste, suitably complimenting bland carbs.

Ingredients:
- 2 handful sweet leaves (leaf only, remove stems)
- 2 cloves garlic (chopped)
- 1 medium onion (chopped)
- 1 medium tomato (cut into 6)
- 2 red chili (cut into squares)
- 1 sweet potato - fist-sized (cut into bite sizes)
- 2 tbsp dried shrimps
- 1 stalk lemongrass (hammered)
- ¼ cup coconut milk
- 3-4 cups water
- 1 tbsp cooking oil 
- Salt to taste

Make into paste (add a bit of water)
- 1 tsp ground coriander (ketumbar)
- 1 tsp turmeric powder
- ½ tsp shrimp paste (belacan)


The Ingredients


How-to:
1) Heat oil in pan. Fry garlic, onion and lemongrass together.

2) Once lightly browned or fragrant, add coriander/turmeric paste and stir quickly.

3) Add dried shrimps, red chilis and sweet potatoes, followed by water. Season with a little salt. Boil until sweet potatoes are cooked.

4) Then, stir in the sweet leaves. Lower the heat and add the coconut milk. Simmer (don't let the coconut curdle) a minute or so and taste.  Season with more salt if necessary.

5) Finally, add the tomatoes and serve.

Sweet simmering surprise

Sweet Leaf, Sweet Potato Soup

Images

Stuffed Squid with Rice in Lemony Tomato Sauce

Stuffed Squid with Rice slathered in Lemony Sauce

I light up when I see fresh seafood in large sizes - big prawns, big squid, big crabs! It's like being in underwater wonderland. I don't buy it often but when I do, I get as excited and cheerful as Mr. Krabs when he sees a dollar.

With two large squids in my shopping bag the other day...

In me best pirate voice:"Arr...what shall I do with you, calamari beauty?"

I decided to make a one-dish wonder - stuffed squid covered in rich lemony tomato sauce. We eat rice almost on a daily basis. I'm used to cooking several side dishes to go along with it. So, I wouldn't consider this too much work. The only difference? It's all going to be served on one plate!

Check out the recipe below for my version of stuffed squid.

Stuffed Squid
Ingredients:
- 2 whole 8-inch squid (cleaned)
- 3 cups hot water
- 1 tsp cooking oil
- Fried Rice (Recipe below)
- Lemony Tomato Sauce (Recipe below)
- 2 toothpicks

How-to:
1) Plunge squid into hot water and remove quickly.
The goal is not to cook it. I do it so that there's less water seeping out from the squid when it's baking midway. It also makes it easier to stuff.

2) Stuff squid with fried rice.

3) Use toothpicks to pin the squid head back on. Make small cuts on top of the squid (shown in the photo below).

4) Place squid on a greased baking dish. Baste squid with cooking oil.

5) Bake uncovered in a pre-heated oven at 160c for 15 minutes more or less until the squid is cooked.

6) Pour lemon tomato sauce over baked squids before serving.


Stuffing Squid with Fried Rice

Make small cuts across the top and toothpick the head on

Once the squid is out of the oven, pour sauce over and serve

Stuffed Squid - A Meal For One

~~~~~~~~~~~~~~~~~~~~~~~~~~~~~~~~~~~~

Lemony Tomato Sauce

Lemon Tomato Sauce
Ingredients:
- 2 cloves garlic (chopped) 
- 1 large onion (chopped)
- 2 medium tomatoes (quartered)
- ¼ lemon (for juice and zest)
- ¼ water
- 1 tbsp sugar
- Pinch of salt
- 1 tsp cornflour (mix with water, into watery paste)
- 1 handful chopped fresh coriander
- 1 tbsp cooking oil

How-to:
1) Heat oil in pan. Add onions and garlic. Fry until lightly browned.
2) Add tomatoes, water and sugar. Scrape some lemon zest in, then squeeze lemon juice into the mix. Stir well and cook until tomatoes look smashed.
3) Season with a pinch of salt.
4) Turn the heat off and stir in the cornflour.
5) Add fresh coriander. Mix well.
6) Serve on top of baked stuffed squid.


Fried Rice with Button Mushrooms and Lemon Zest

Fried Rice
Ingredients:
- 1 cup cooked white rice (enough to stuff 3/4 of two squids)
- ¼ canned button mushrooms (out of 425g can)
- 1 handful thinly sliced beef strips
- 1 clove garlic (chopped)
- 1 red chili (chopped)
- Lemon zest
- ½ tsp dark soy sauce
- Pinch of salt and pepper (to taste)
- 1 stalk fresh coriander (chopped)
- 1 tbsp cooking oil
- A bit of water

How-to:
1) Heat oil in pan. Fry garlic until lightly browned.
2) Add mushrooms, chili and beef strips. Stir until beef strips are cooked. Add soy sauce and a bit of water (enough to help coat the rice brown). Then, add white rice.
3) Season with salt, pepper and lemon zest. Mix well.
4) Turn the heat off. Add fresh coriander and mix well.
5) Stuff this rice into the squid.

Images

Braised Mushrooms With Snow Peas and Black Fungus

Truth be told - I splash oyster sauce into most of my braised soy sauce dishes because I 'believe' it compliments the overall taste.

It's also a quick and easy way to add robust flavour into a simple dish of vegetables. A dash here and there into a hot wok of greens and it's ready to be served in minutes!

Below is a recipe for a simple dish I made the other day using mostly gooey sweetish oyster sauce.

Braised Mushrooms With Snow Peas and Black Fungus

Ingredients:
- 10 pcs dried Chinese mushrooms
(Soak in water for 1-2 hours until rehydrated, then remove stem. Rinse and change water once in between.)
- 10-15 pcs dried black fungus
(Small, soft variety - soak in water for 30mins until soft and spongy. Cut away hard parts. Rinse and soak in fresh water until ready to cook.)
- 20 pcs snow peas
- 1 clove garlic (chopped)
- 3 tbsp Oyster sauce
- Pinch of chicken stock granules
- 1 tsp cornflour (dilute in 1 tbsp water)
- 1 tbsp cooking oil
- A handful of fresh coriander for garnishing (roughly chopped)

How-to:
1) Heat oil in pan. Saute garlic until lightly browned.

2) Toss in the wet mushrooms and black fungus. While stirring, season with oyster sauce and chicken stock granules. Coat well with sauce and cook covered for 1-2 minutes. 

3) Add the snow peas in, stir until cooked.

3) Add cornflour into the mix. Give it a quick stir and serve garnished with fresh coriander.

Note: (
You can add a bit of water if you want more sauce.

I do not drain away excess water from the mushroom and black fungus before cooking. I usually toss them in wet, dripping with water. This water makes the sauce.)


Braised Mushrooms With Snow Peas and Black Fungus topped with Fresh Coriander

Images

Mashed Pumpkin and Brinjal Tomato Curry

Mashed Pumpkin and Brinjal Tomato Curry
 
This is something that came about when I had to leave on an impromptu trip. It was a family emergency.  After two weeks of playing nurse, I finally flew home.

The first thing I did was head for the refrigerator. There were fruits and vegetables just begging to be cleared! So, I had myself a cook fest. I cracked my knuckles, sifted through a ton of recipes and got down to thinking. Did I find anything in the cook books? ........ No.....but it was a good mental warm-up.

I decided on something mushy that would be heavenly for leftover bread. Mashing pumpkin and brinjal together in a tomato curry gravy seemed like a brilliant plan. Plan? That's not entirely true - both had to go into the pot pronto, or risk being demoted into the bin.

Anyway, it turned out so yummy that I was sad I didn't have more of it. It was sweet and saltish, mildly sour but rich in flavour from the many vegetable ingredients that were included.

This is how I did it. Enjoy!  

Ingredients:
- 2 medium round brinjal aka aubergine or eggplant (remove skin, julienne)
- 1 cup cut pumpkin pieces
- 2 medium tomatoes (cut into pieces)
- 1 large onion (chopped)
- 4 garlic cloves (chopped)
- 1 calamansi
- 1 red chili (sliced)
- 1tbsp blended chili
- 1 tbsp tomato puree
- 1 tsp curry powder, 1 tsp coriander powder, 1/2 tsp turmeric powder (add some water, mix into a wet paste)
- Pinch of belacan paste (shrimp paste)
- 2 star anise
- 4 cardamom pods
- 2 tbsp cooking oil
- About 1 cup water 
- Salt to taste

The Ingredients

How-to:
1) Heat oil in pan. Fry onion and garlic with star anise and cardamom pods.

2) Stir in curried paste and belacan. Fry quickly, add in tomato puree and chili.

3) Then, add in all the vegetable ingredients. Stir until well coated.

4) Add water (just enough to cook all the ingredients through). Squeeze in calamansi juice.

5) Season with salt and cook until all the ingredients are tender.

6) Using your spatula, mash lightly into a thick gravy.

Serve with bread or rice.

Smoking hot in the pot

Yum-Yum Mashed Pumpkin and Brinjal Tomato Curry
Images

Lala (Clam) Soup - A Spicier Take!


Lala Clam Soup

Lala, the Asian soft-shelled clam - one of my favourite seafood. I've often wondered how it got its name..just as hubby's often wondered what isn't my favourite food. Aahh.. I am so easy to please, food-wise.

If I had to use a song to describe this soup, it would be Kylie Minogue's La la la la lalala la ..can't get you out of my head for obvious cheesy reasons.

Lala clams cooked in a ginger based soup isn't something new but it is exciting on the taste buds. Ginger is often used to cover up that "fishy smell" of seafood. In this recipe, it also compliments the soup with a more robust flavour.

I  would say that this soup has a deep gingery, sweetish and spicy taste to it. The spiciness comes mainly from the chili and ginger. 

It's a simple recipe, using ingredients commonly found in Malaysian supermarkets.
 
Ingredients:
- 160g lala clams
- 2 cloves garlic (chopped)
- 2 thumbs fresh ginger (julienned)
- 2 pc black fungus - medium variety (soak until soft - about 30 minutes, remove woody part and slice if you wish. I left it whole)
- 1 tbsp dried wolfberries or more (soak in water until soft - about 5 minutes)
- 5 green bird's eye chilies (seeded and sliced in half)
- 5 medium grey oyster mushrooms (halved)
- 1.5L water
- 1 stalk coriander (chopped, for garnishing)
- Cooking oil
- Salt and white pepper to taste

The Ingredients
How-to:
1) Heat pot with oil and saute the garlic until lightly browned.Then, add the ginger and green chilies. Stir it about and add water. Season with a pinch of salt and pepper.

2) Allow the water to boil for just awhile longer to get that ginger taste out before adding the black fungus, mushrooms, wolfberries and lala clams.

3) Once all the ingredients have been added into the pot, let it cook for a few minutes further. Taste, season accordingly and it's done!

4) Serve garnished with coriander.

There she boils..

There you have it - lala clams in hot, hot soup! Prepare to tissue it out.

Lala Clam Soup - Hot stuff!
Images

Baked Fish with Kiwi in Sweet and Sour Sauce

The Asian Seabass - Baked and smothered in sweet and sour Kiwi sauce

A couple of weeks ago, I blogged about one of my favourite food, the Thai-inspired Deep Fried Fish in Three-Flavoured Sauce.

I did say that "it would be a matter of time" before I fire up my own stove to recreate a similar dish. It's happened sooner than I thought! And being me, I changed the recipe a little here and there for convenience sake and to suit my visual needs. I've got to go, "Whoa! What a sight to behold!"  ..silly as it sounds.

Finally, I couldn't decide if it could be called the "Three-Flavoured Sauce Fish" although technically, my version also passes for sweet, sour and spicy.

The original recipe calls for crisp fried fish... but my fish was way too large to fit into my electric pan so I did away with that step. I marinated the fish with some salt and black pepper, and popped it into the oven instead.

That's my baked fish - Asian Seabass / Barramundi !

For the sauce? A simple mix of Tesco's sweet and sour sauce with lots of cut ingredients. Typically, this recipe should include cubed pineapples but I figured a kiwi fruit would be more exciting.  It was a wonderful swap. I so loved the vibrant colour it added into the dish and how the sauce evolved into something that is very much alive in yummy flavour!

Here's how I did it, the recipe and how-to.

Ingredients:
- One whole fish (Seasoned with salt and pepper and baked, or deep-fried if you prefer)

(Estimates for a 12-inch Barramundi fish - adjust accordingly)
- 2 cloves garlic (chopped)
- 2 medium red onions (chopped)
- 1 lemongrass (sliced thinly - peel/cut away the dry parts of the stem, use only the soft middle part)
- 2 tomatoes (cut into cubes)
- 1 kiwi fruit (cut into cubes)
- 1 red chili (seeded and chopped)
- 1 green chili (seeded and chopped)
- A handful of fresh coriander (roughly chopped)
- 2/3 cup sweet and sour bottled sauce (or combine sweet chili sauce with tomato ketchup)
- 1½ tbsp corn flour (mixed with water, into a diluted paste)
- ½ cup water (more or less)
- Cooking oil


The Ingredients

How-to:
1) Heat oil in pan. Fry garlic and onions (not all) until lightly browned.

2) Add lemongrass. Give it a quick stir and then, add the tomatoes and chilli. Pour in the sweet and sour sauce and some water. Mix well and let it cook awhile until the tomatoes look smashed. Add water if it gets too dry.

3) Add the remainder of the onions and the kiwi fruit. Stir quickly (that is, don't let it cook), to coat it with the sauce.

4) Lift  the pan off the fire and pour in the corn flour mixture. Give it a quick stir. The gravy will thicken slightly, giving the sauce a gooey shine.

5) To serve, plate the fish and pour the kiwi sauce over the fish. Garnish with fresh coriander. 

Last in! Kiwis and Onions - to keep the crunch and freshness

There you go - Baked Barramundi with Kiwi in Sweet and Sour Sauce!


Images

Baked Mandarin Orange Chicken with Buttered Potatoes and Apples

Baked Mandarin Orange Chicken with Buttered Potatoes and Apples

Distributing mandarin oranges to friends and family during the Lunar New Year is an age-old practice for people with Chinese roots in my homeland. I received my fair share during the festive season. That said, this is a long overdue blog post, at least two months behind schedule!

Aaah..anyway, back to the oranges. I wish I could have eaten it all as is, peeled fresh and just out of the fridge, but there was more than this household could handle with two boxes in keeping. So, I did what I could to clear it off quicker - I decided to cook it. And this is really yummy stuff although it's a simple recipe! Then again, when it comes to food, I've rarely ever said yuck.

I didn't mess the flavour with too much seasoning. I felt the juice from the orange would be sufficient to pass for delicious and it did.

Ingredients:
- 2 chicken drumsticks
- 2 potatoes (sliced thin, not all the way through)
- 2 red apples (sliced)
- 2 medium red onions (quartered)
- 3 mandarin oranges (Peel skin off from the segments of two oranges. Squeeze the juice out from one)
- 1 tbsp salted butter (softened)
- Salt and pepper to taste
- Cooking oil

How-to:
1) Season chicken with a little bit of salt, pepper and some mandarin orange juice.

2) Place the chicken on a lightly oiled baking tray. Add onions, orange segments and the remainder of the orange juice to create the yummy gravy. Sprinkle on a wee bit of salt and pepper.

3) Spread butter onto apples and potatoes. Place in a separate baking tray (also lightly oiled).

4) Bake for about 45 minutes at 175C. Baking time differs. You're done once the chicken is cooked and the potatoes are tender.

I garnished mine with some chopped celery leaves.
 
In the oven - Chicken with mandarin oranges

Baked Chicken and Mandarin Oranges


Images

Nai Pak Choy (Extra Dwarf Chinese Cabbage) with Pork in Egg Gravy

Extra Dwarf Chinese Cabbage (Fairlady) in an Eggy Gravy

Extra dwarf chinese cabbage..mmm. Ok, that's a weird translation for"nai pak choy" but it was the closest description I could find on the internet. That, and Fairlady - something I connect only to Nissan..

Nai Pak Choy - it's fresh, it's so fresh!

It has a distinctive thick white stem with dark green scrunched-up leaves. This particular head that I'm holding up for the camera has also been in my fridge for four days but looks as fresh as when it was popped into my shopping cart.

I've often included this vegetable into soups. Soups are a must-have on our dinner table. It's almost a daily affair and I'm surprised I haven't resorted to pulling my hair out yet thinking what to put on the table everyday. When I'm short of time, the nai pak choy comes in handy for making a quick bowl of soup. I'd toss it into a hot pot of boiling water with just garlic, some seasoning and voila! Sneaky, I know.

Today, I wanted to try out an eggy gravy that I so often see served in Chinese restaurants.  It gives the otherwise plain stir-fry green vegetables dish more appeal and more "slurp".

It's a simple recipe but requires some quick work, so I would prepare everything before I even think of lighting up my pan and I would keep things close.

Ingredients:
- 2 cloves garlic (chopped)
- 200g / 7 heads nai pak choy (cut stemmed leafy parts away from main stem)
- 1 tbsp dried wolfberries (soaked for 10 minutes)
- 50g boneless pork meat - loin (sliced thin)
- Two small eggs
- 1-2 tbsp cooking oil
- 1-2 cups water
- 1 tbsp corn flour (diluted in 2 tbsp water)
- Salt and pepper to taste

How-to:
1) Heat oil in pan. Add garlic, fry until lightly fragrant. Add pork slices, stir it about.

2) Add 1 cup water or more (just enough to make the sauce). Once it boils, add wolfberries, vegetables and season with salt and pepper.

3) When the vegetables are almost cooked, stir in the corn flour and lift the pan off the fire.

4) Crack one or two eggs in, immediately stirring it but lightly. Quickly serve it out onto a plate before the egg cooks further.

The result? You can taste the juice from the pork, mixed with a mildly salted egg sauce. Along with it, is a tinge of sweetness when you bite into a wolfberry.


The ingredients - Nai Pak, Wolfberries, Pork, Egg and Garlic

Toss the vegs in once the water boils

Nai Pak Choy (Extra Dwarf Chinese Cabbage) in an Egg Gravy


Images

Fish Balls in Ginger Sauce

Yummy Fish Balls in Ginger Gravy

Fish balls are easily found in Malaysia and perhaps one of the commonest food you'll see in our supermarkets.

I usually dump them into soups but decided to explore a different angle. This is a simple dish that goes well with Hainanese Chicken Rice. It is a delicious strong flavour of oyster sauce and ginger, topped with the pungent aroma of spring onions.

It took me less than half an hour to prepare and cook this.

Ingredients:
- 15 fish balls
- 1 clove garlic (chopped)
- 2 thumbs ginger (cut into smaller pieces, blend in a bit of water or some chicken stock until fine)
- 1 stalk spring onion (sliced)
- 2 tbsp oyster sauce
- Dash of sesame oil
- 1 tbsp cooking oil

How-to:
1) Heat pan with cooking oil. Stir-fry garlic until fragrant.

2) Add blended ginger, oyster sauce and a dash of sesame oil. Stir well, then add fish balls. Stir until everything is cooked and well coated with sauce.

3) Serve garnished with spring onions.

Images

Pan-Fried Shrimp Corn Cakes

Shrimp Corn Cakes and Tomato Ketchup

Bloom wherever you are planted, and right now my feet is firmly rooted to the kitchen. Hence, the inspiration for this little floral design using shrimp cakes, spring onion and tomato ketchup.

I have been diligent in ensuring that my fridge does not get loaded with leftover cooking ingredients. A spotcheck revealed that it was time to clear off the spring onions which was starting to lose it's shade and some leftover corn kernels which had been sitting there for a week.

With it, I made shrimp corn cakes - a very doable and versatile recipe. It makes for a nice tea treat.

And how did I come about this recipe? I went by blind intuition that surely egg and some flour could stick all the ingredients together!

Ingredients:
- 400g small shrimps
- 1 medium onion (roughly chopped)
- 2 cloves garlic (roughly chopped)

- 2 tbsp sweet corn kernels
- 1 tbsp spring onions (chopped)
- 3 tbsp rice flour
- 1 egg
- Salt and black pepper to taste
- Oil for frying

How-to:
1) Blend shrimp, onion and garlic into thick paste.

2) Add corn kernels, spring onions, rice flour and egg into the blended shrimp paste mixture.

3) Season with salt and pepper. Stir well.

4) Heat oil in cooking pan. Spoon tablespoon-sized paste onto pan. Fry until cooked and browned - takes just a few minutes.

I got 16 pieces out of this portion.

Best eaten with tomato ketchup.

Note: You can double the quantity of corn and spring onions if you prefer or replace it with other ingredients, like chopped boiled carrots or coriander.  


Rice flour, corn, shrimp and an egg

Add spring onions and mix it all together

Fry it

Tadaa..Shrimp Corn Cakes!

Shrimp Corn Cakes on the inside